Exercise 09
- Eduardo Durão Antunes

- Apr 30, 2025
- 3 min read
Updated: May 12, 2025
Drawing the plans of a Bullfight Arena
Exercise 09 can be elaborated in Rhinoceros (.3DM) or ArchiCAD 28 (.PLN).
ArchiCAD — Student Version
ㄴ free, upon proof of student status;
ㄴ duration of 1 year;
ㄴ renewable after 1 year, upon proof of student status
Instructions for drawing the plans
Floor Plan Drawing
To design:
The floor plan at the arena level (where the pens are visible);
The plan at the level of the boxes and/or galleries, immediately above the stands;
If there are only benches, draw the plan of the benches or the roof.
Software
Drawings can be elaborated in Rhinoceros (.3DM) or ArchiCAD 28 (.PLN).
In the case of Rhino :
Use curves, lines and hatches.
In the case of ArchiCAD 28:
Use generic walls of 0.10 m; 0.15 m; 0.20 m; 0.25 m, etc.;
Use single or double opening doors, of the metal type without frames;
Use single or double sliding metal doors;
Sash doors must be inserted as a simple opening or as a void inside the walls;
The leaves of all doors must be between 0.03 m and 0.05 m thick.
ArchiCAD configuration
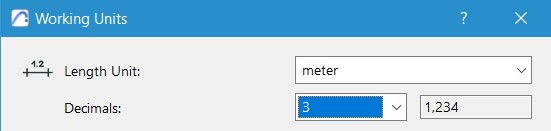
Units
If you need to change the units in your ArchiCAD document:
ㄴ Options > Preferences > Working units > Length Unit : meter / Decimals : 3

Black and White plan
All drawings must be set to print in black and white using the "Simple Plan Overwrite" option.

Satellite Images
If at a scale of 1:200, then the image is inscribed in a square of 250x250 m.
If at a scale of 1:600, then the image is inscribed in a square of 750x750 m.
Drone Image over Satellite Image
To adjust the images obtained by drone with the satellite image, in Rhino, and not resorting to spelling correction, use the ORIENT3P command:
ORIENT3P: select the drone image, mark three points and match these points with the satellite image, in the same order. If necessary, insert the POINT geometry beforehand, to facilitate the matching.
Then use the SCALE or SCALE 2D command to adjust the scale based on these three points.
If necessary, use SCALE1D to compensate for any eccentricities (the arena must normally be a perfect circle).
Project Design
The insertion of images with the project, at the level of the arena and the boxes/gallery (or the roof, if there are no boxes/gallery), must take into account that the arenas normally have a perfect circular configuration .
Therefore, any SCALE1D should be used to adjust the scale along the X or Y axis, ensuring that the arenas are, in fact, circular.
Confirm the dimensions of the arena or the exterior of the square in the project image.
If such information does not exist, use satellite images to obtain an approximate value (tolerance between 2.5 cm and 5.0 cm).
Layers
A layer for the elements being cut;
Another for the elements in view;
A third for the plots (hatch — solid black);
A fourth to indicate the center of the arena and the north direction.
If necessary, auxiliary layers can be created to mark axes or other relevant elements.
The drawing must comply with representation standards at a scale of 1:100 .
File naming
The files to be sent must be named:
001-floor 0 plan (.3dm or .pln/.dwg format)
001-cabin floor plan (.3dm or .pln/.dwg format)
001-roofing floor plan (.3dm or .pln/. dwg format)
corresponding the initial number to the number of the Arena file (001, 002, 042, 117, etc.)
NOTES:
In ArchiCAD, the resulting 3D model will not be evaluated, only the 2D model saved in PLN and DWG formats.
It is recommended that all elements are grouped together in a single folder to avoid losing links.
In the case of auxiliary lines in ArchiCAD, draw lines and curves as "documents" (in the left sidebar).
The insertion of digitized plans can be done at ground floor level, since, being heavy, they will not appear as a reference in superior views.
If necessary, create new layers, but at the root of the ArchiCAD layers structure.
Comments